DIY
March 25, 2018All this Spring weather definitely has us looking forward to the snow being gone for the year! However, it’s still to wet outside to fully enjoy the warmth… So bring Spring inside with some of these fun crafts from Fiora!
These are quick and easy projects that are perfect to do with the kiddos. With Easter coming up soon, they are also the perfect addition to your Easter decor. Plus, your kid’s will love showing Grandma all the fun things they made!
These cute little candle holders are quick and easy to make and are the perfect size for battery operated t-light candles. They’ll add a pop of color without taking up too much space so you have more room for all your favorite Easter foods.
What You Need:
Fiora Toilet Paper Tube
Scissors
Paint
How-To:
Cut one Fiora Toilet Paper tube in half, then make 5 slits about halfway down one end of tube.
Cut petal shapes on each of the 5 sections. You can make them rounded, have a slight point or do a variety of petals.
Curl the 5 petal sections outwards.
Paint flowers different colors, add sparkles, jewels or any other embellishments, if desired.
Once dry, place battery operated t-light candle in center.
Napkin Rings are a fun way to add some Easter Flare to the table! You can coordinate the ribbon color to work with your decor, or do a variety of colors.
What You Need:
Fiora Toilet Paper or Paper Towel Tube
Scissors
Glue
Paint
Ribbon
Stickers
How-To:
Cut Fiora Toilet Paper tube or Fiora Paper Towel tube into 1 inch sections.
To make napkin rings stronger and more durable, use 2 rings, cut 1 of them open and remove a small amount so it will fit inside the other ring.
Glue cut ring inside of the other and allow to dry.
Paint each napkin ring white, allow to dry.
Glue ribbon around napkin rings to achieve desired coverage.
Add Easter stickers or any other desired embellishments to each ring.
Last, but not least, are these adorable flowers! Weather you make one, or a whole bouquet, they’ll make any room brighter!
What You Need:
Fiora Paper Towel Tube
Scissors
Glue Stick and Hot Glue
Paint
Button
Chop Sticks or Wooden Skewers
How-To:
Flatten, then cut Fiora Paper Towel Tube into 6-7 sections.
Take 5 sections and glue points together to make flower shape, let dry.
Paint flower as desired.
Take remaining 1-2 sections of tube and paint green for leaves and paint chop stick green for stem.
Once dry, take hot glue (carefully!) and glue button to center of flower. Then glue flower on pointed end of chop stick and finish by gluing 1 leaf on each side of chop stick.
Once cooled, place in small bucket or flower pot to use around the house for Spring decor or as a centerpiece for Easter! [...]
Read more...
February 13, 2018The beginning of the year always goes by SO fast! It’s hard to believe it’s already Valentine’s Day. Luckily that means the end of this cold Winter isn’t too far away either!
Valentine’s Day is always a great time of the year to reflect on the people in your life that mean the most to you, whether that’s a husband, children, siblings, parents or friends. It’s a good reminder to make sure those people know just how much they mean to you! This year, I decided to do some fun Valentine’s Crafts that would be great to do with the kids!
The first part of the video shows me making a felt candy flower. I used Tootsie roll suckers since they’re my husband’s favorite. I just cut out a bunch of hearts out of felt and hot glued them on. Super fast, really easy and also really inexpensive! Maybe let the little ones use some craft glue versus the hot glue tough.
Up next is another fast, easy and inexpensive one, the candy pouch. You could make these much smaller than what I made. Just make sure the opening is big enough to fit the candy inside. These would be a fun one for kids to hand out in class.
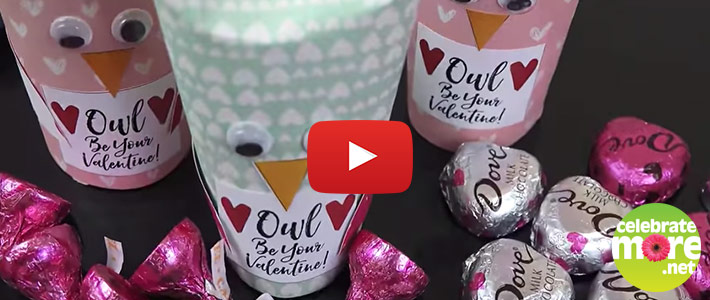
Lastly, my favorite one of all, the Owl Valentine! I think these are seriously adorable! I bought a couple sheets of scrap book paper for mine, but you could also use plain computer paper and let the kids decorate it. If you’re using craft glue, I would suggest using a couple rubber bands to hold the paper around the toilet paper tube while the glue dries. While it dries you can cut out the “Owl Be Your Valentine” squares and the beaks with this free printable!
I hope you have some fun with these! Happy Valentine’s Day!
Ashley,
Coborn’s Inc. Social Media/Creative Specialist
[...]
Read more...
November 28, 2017Happy Holidays! This is always a fun time of the year to get crafty and make your own decorations or gifts. I love decorating my home every year for Christmas and I especially love adding more decoration each year. This year, I decided to try out some new ideas for centerpieces. Better yet, they’re all edible!
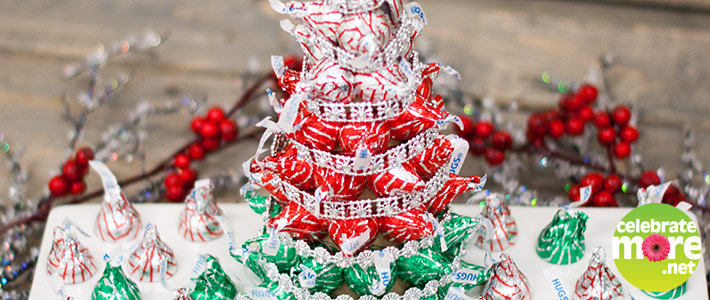
This one was a little more time consuming, but totally worth it! I got a cardboard cone from my local craft store and a bag of Hershey’s candy at Coborn’s. I did this one using Hershey’s Hugs since they’re my husbands favorite, but you can use any flavor you want or go off the packaging so it matches your decorations. I just used hot glue to attach them to the cone and I have a bunch of random craft stuff so I added some sparkle with garland.
Another one of mine and my husband’s favorite candies are Red Hots or Cinnamon Imperials. This is a super fast one to put together. I just grabbed a couple martini glasses and a champagne glass, filled them up, and added a few candy canes. Then I added more sparkle with the little bows, boxes and snowballs around the base of the glasses. Use what you have on hand! Garland would work great around these too.
My last centerpiece idea was also really quick and easy. This one is also my favorite since I love decorating with blue and silver. I got a bag of the cookies and cream Hershey’s candy, put them on a plate and simply added some sparkly bows and snowballs. Cute and tasty!
Hopefully these ideas will inspire your Holiday decorating!
Have Fun and Happy Holidays!
Ashley M.
Coborn’s Inc. Social Media / Creative Specialist [...]
Read more...
October 17, 2017
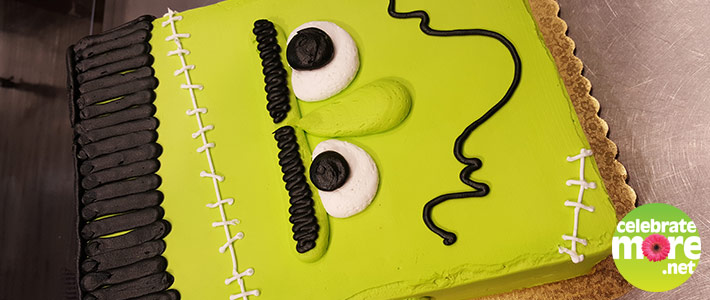
It’s Alive! Cakenstein!
The leaves are falling and the spider webbing is going up. Light your candelabra and prepare to serve up a scary good cake to your favorite ghouls and goblins. It’s… Frankenstein’s Monster! Well, make that his sweeter distant cousin, Cakenstein!
I will be using a ¼ sheet of cake and 2 lbs. of icing. You’ll a few pastry bags and round tips (size 8 and size 3) as well as food coloring, I used black, yellow, and green liquid gel.
In preparation of piecing our monster together, you’ll want to color your icing. From my 2 lbs. of white I put 4 oz. of white in a piping bag with a coupler. Then I scooped out another 8 oz. and colored it black. The remaining icing I colored neon green. I like my bright greens on the yellow side. I used a teaspoon of yellow liquid gel and 3 drops of leaf green. Liquid gel is stronger than the little droplet bottles you find in the spice aisle of the grocery store. You would need much more than I used to get the bright colors.
Now, a quick note before you start mixing! If you are new to icing a cake you make need a little more green than I used. I ended up with a small fist sized ball of icing left after icing my cake. If you are still battling the crumbs when you ice you may want to have an extra ½ lb. of green in the bowl to start with to give you more icing to work with. Or, just cut back on the white and black that you bag up to start with. I probably used half of the white and maybe half of the black. It’s just nice to have more than you need in the bag, it makes it easier to squeeze and you won’t run out half way through should you have oopses.
Alright, you’ve got the icing. You’ve got a cake. You’ve got the equipment, time to let the experiment begin! Ice your ¼ sheet cake with the lime green icing. You should have some extra icing left. Bag this up in a piping bag with a coupler.
I’m going to pipe his face using the coupler, no ring, no tip. Draw his brow in about the middle of the cake. Next pipe a nose, start from the tip of his nose with a round circle and then bring it upwards tapering off at his brow. Think of a large teardrop shape. Using the same bag finish off the green parts by piping his ears on the sides. One side is a “C” shape and the other is a backwards “C”. Next up, his hair.
Using the bag of black icing with a size 8 round tip, pipe his hair. I like to leave it as a bunch of straight lines with slight variations in the length. Think of piping fence posts, really close together, across his forehead. Carry the hair lines down the sides of the cake as well. For the top of his head where we won’t really see it, you can either keep piping lines or, my preference, smooth it out. Just fill in the space roughly and then use a small spatula to smooth it out. Why do I like that? It’s just less black icing on the cake. It’s still black, but it’s a thinner layer.
Okay, we’ve given him face parts and hair. Let’s add in some eyeballs. Using the white with just the coupler in the bag, no coupler ring or tip, pipe his eye balls. I like my scooted up against his brow. I think it gives him more character than two big wide awake excited eyes. But, maybe your Cakenstein is wide awake and happy to see you… you are the mad scientist, the choice is in your hands! After the whites you can use the black with the size 8 round to pipe in pupils.
Our monster needs a few more details. A size 3 round with the white icing is perfect for making stitches. I chose white to brighten up the cake and bring balance to all the black. Little white dots in his eyes will bring live to his expression. I gave mine a squiggly smile with black and a size 3 round tip. And he needed neck bolts, I piped them with the size 8 round tip in black. I liked the white, black, lime color scheme and didn’t want to throw in random gray on the side. A few little highlight lines in white and the bolts fit in well with the minimalist color scheme.
And with that, throw the switch and pull back the sheet! Cakenstein lives!
Amanda,
Coborn’s, Inc. Pastry Arts Training Specialist
Click Here for more blogs written by Amanda. [...]
Read more...
April 2, 2017We all have waited for Spring and with Easter coming I thought I would do a few crafts using Fiora Toilet Paper Rolls. We all have the empty rolls so why not have some fun and use them.
Upcycled Toilet Paper Roll Bird Feeder
This bird feeder is a great reuse of empty Fiora Toilet Rolls and is simple enough for even kids to make!
You will need
Fiora Toilet Paper Rolls
Peanut Butter
Knife
Plate
Birdseed
Yarn or Ribbon
Instructions
Spread peanut butter over the outside of the cardboard tube as if you were icing a cake. You’ll want enough for the seed to stick well.
Pour the seed onto a plate and roll the tube around, pressing the seeds in as you go.
After a few minutes, re-roll the tubes so that any empty spaces where seeds have dropped can be filled in.
Thread one yard of yarn or ribbon through the opening of the roll and tie the top.
Hang it in a tree and watch the birds come to eat.
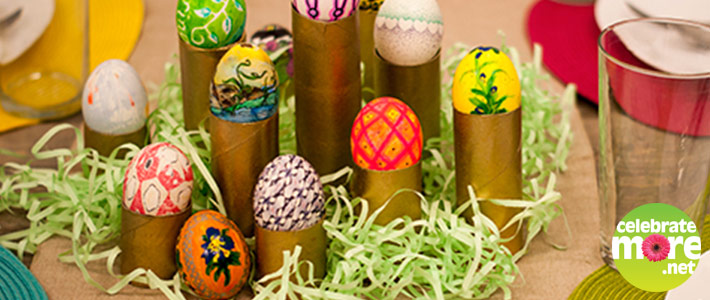
Upcycled Paper Towel and Toilet Paper Roll Easter Egg Display
Blown Eggs
You will need
1 Dozen Eggs
1 Sharp Pin
1 Piece of Wire
Instructions
Make a small hole in the top & bottom of an egg by sticking a pin in each end
Remove the pin
Poke a wire into one of the small holes and stir it around to break up the egg yolk inside the egg
After removing the wire, blow into the top hole and the insides of the egg should come out the bottom hole which is a little bigger
Paper Towel and Toilet Paper Egg Holders
You will need
1 Dozen Toilet Paper and/or Toilet Paper Rolls
Gold Spray Paint
Scissors
Instructions
Cut the Fiora Toilet Paper Rolls different sizes
Spray paint rolls gold
Arranged decorated eggs on top
Add Easter grass
Egg Decorating Ideas
erm
Dotted Heart Egg
Use heart shaped stickers and place them around your egg
Using a fine tip marker dot around the stickers
Remove stickers to reveal heart shapes
Silk Tie Eggs
Use silk ties to transfer the tie designs onto the egg shells
Dip the swatch of tie into water so it sticks to the egg
Wrap swatch around the egg
Wrap a layer of cheese cloth around the tie and secure with rubber bands.
Boil the eggs in water and vinegar, and cool
Remove bands, cheese cloth and ties to reveal their unique designs
Marker Designs
Simply grab some markers and get to work to create these beautiful eggs.
Water color
Use a watercolor pen & markers to make a one-of-a-kind landscape.
Painted
Grab those craft paints and brushes and create beautiful floral designs on your egg.
Upcycled Toilet Paper Roll Easter Surprise Poppers
This is so easy and fun to make for the grandchildren. The kids love finding these surprises in the yard along with their Easter Eggs. I assign each grandchild a certain color and I put their names on the surprise poppers so then they all get the same amount … and, hopefully, no fighting!
You will need
Fiora Toilet Paper Rolls
Scissors
Wrapping Paper or Construction Paper
Ribbon
Candy and/or Trinkets
Instructions
Cut a Fiora Toilet Paper Roll in half
Cover the 2 pieces together (end to end) with wrapping or construction paper
Secure one end with colorful ribbon
Fill from the other end with playful prizes like candy or trinkets, gum, stickers, money
Secure the open end with an additional piece of ribbon
To find the fun inside, twist and pull at both ends to crack open the surprise!
Upcycled Paper Towel and Toilet Paper Roll Cord Wraps
These are so easy and so useful. How many things in your house have a cord? Iron, blow dryer, electric knife, toaster, phone devices, electrical cords, heaters, fans, sewing machine plus many many more.
You will need
Fiora Toilet Paper Rolls
Scissors
Contact Paper
Instructions
Simply wrap contact paper around an empty toilet paper roll
Cut off any excess contact paper
Squeeze your wraps cords and slide into your new cord wrap
Upcycled Toilet Paper Roll Seedling Pots
You will need
Fiora Toilet Paper Rolls
Scissors
Planting soil
Seeds
Spray Bottle filled with Water
Instructions
Cut 4 slits into the bottom of each tube 1” up from the end and then criss crossed them like a box bottom
Add planting soil into these tubes
Press a few seeds into the dirt and cover the seeds up with a little more dirt, then spray with water
Hold all of your tubes in an old cake pan and place near a window
Create a ‘mini-greenhouse’ effect by covering the entire pan with clear plastic wrap with some holes in the top
Every day, check the moisture of each toilet paper roll and add more water if necessary (Keep the soil moist, but not soggy)
Once the seedlings germinate, remove the plastic wrap.
Plant our seedlings (with their toilet paper rolls) in the flower bed once they are sprouted and the weather is the right condition.
The cardboard from the toilet paper rolls will disintegrate into the soil.
Lynell
Coborn’s, Inc. Graphic Designer
Click here for more blogs by Lynell
Save [...]
Read more...

February 2, 2017DIY Easter Egg Inspiration
Get crafty this spring with these “out-of-the-ordinary” ideas for decorating Easter eggs.
Beer Mug
Yellow Egg Dye, White Felt, Gold Marker, Light Brown Pipe Cleaner, Glue Gun
Carrot
Orange Egg Dye, Gold Marker, Green Raffia, Glue Gun
Strawberry
Red Egg Dye, Black Marker, Green Felt , Green Raffia, Glue Gun
Barbeque Sauce
Brown Egg, Black and Gold Markers, Brown Pipe Cleaner, Copper Sparkle Tape, Glue Gun [...]
Read more...
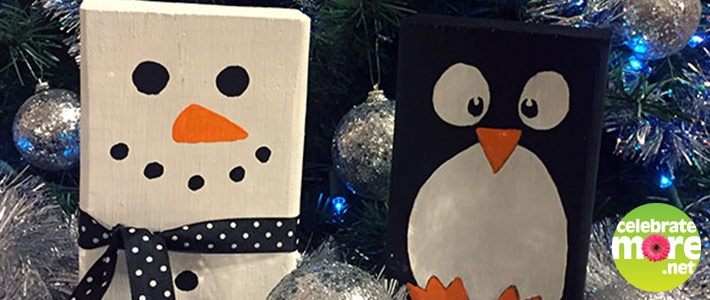
December 15, 2016I can’t believe Christmas is right around the corner! Even though I try to get my shopping done early, there always seems to be a need for last minute gift ideas. Running out to the store isn’t always an option, so here’s a couple gift ideas that I was able to make with things around the house.
My husband is always working on some project or another so we always seem to have 2×4 scraps on hand. So, I grabbed a couple, sanded them a bit and grabbed my paint. These are a fun project to do with kids as well and once again, there is no wrong way to do them! Any length of board will work and there are so many options including snowmen, penguins, reindeer or santa.
Since I do a little bit of sewing, I had some extra fabric laying around. This quick sewing project makes an awesome gift and can literally be made in less than 10 minutes. The even better part… there’s no wrong size to make them! I had a fat quarter that I cut in half to make into 2 rice packs.
Here’s how to make them:
Fold the fabric in half with the colorful side facing itself.
Sew a quarter inch seam down both long sides and one of the short sides.
Flip fabric right side out.
Sew a seam across the middle leaving about an inch open on each side for the rice to fall through.
Depending on how long your rice pack is, make 2 more seams across to divide the pack into 4 sections allowing about an inch of space on sides for the rice to move between sections.
Fill with rice till bottom 3 sections are filled with rice (or about 75% full).
Tuck edges of the open edge inside, pinning if needed, and sew a quarter inch seam across to close the rice pack.
These homemade rice packs are so nice in the winter. Just put them in the microwave for 2-3 minutes and they are perfect to wrap around your neck or warm up your feet. They can also be kept in the freezer to use as an cold pack. Their versatility makes these a great Christmas gift!
When you’re in a pinch and don’t have the option of utilizing things from around the house… a gift basket is always a quick, easy and thoughtful gift to pick up and put together. This gift basket has all sorts of awesome J.R. Watkins products in it, all of which can be picked up at your local Coborn’s store!
Hopefully these ideas come in useful to help make your Holiday Season a success!
Merry Christmas!
Ashley M.
Coborn’s Inc. Graphic Designer [...]
Read more...
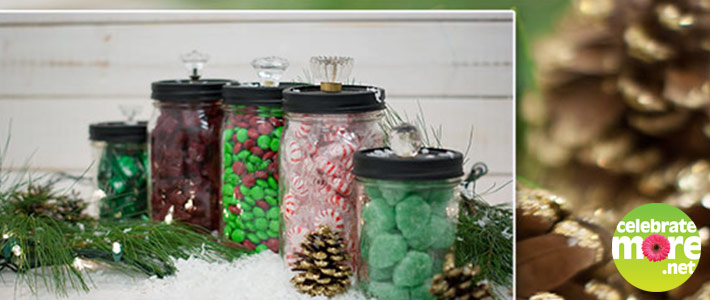
November 29, 2016Happy Holidays Everyone!
This Holiday season I wanted to make something quick and simple. So, I bought some Kerr jars which you can find at your local Coborn’s store.
I started by poking holes in the center of the lids using a hammer and nail. Then, I spray painted the rings and lids black. To finish this project, I screwed glass knobs on the top of each lid.
And that’s it! Simply fill these with your favorite candies or snacks. These are great to give to a teacher, friend or neighbor. They also look great in a set to put on your mantel.
Wishing you a peaceful holiday season.
Lynell
Coborn’s, Inc. Graphic Designer [...]
Read more...
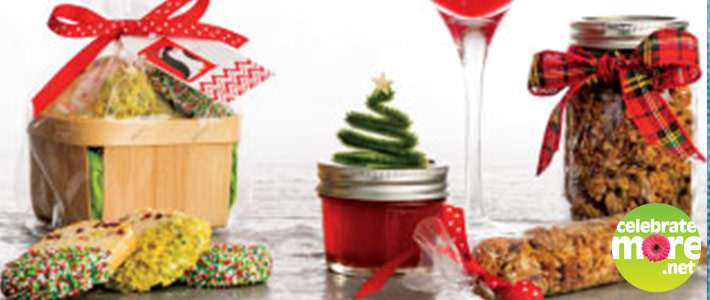
November 19, 2016DIY Holiday Gifts
Do-it-yourself edible gifts are an easy way to save time and money during the holidays. They also make thoughtful and unique presents that can be easily crafted with the help of a few simple ingredients and supplies. Mason or mini cookie jars, small baskets and cellophane bags make perfect vessels for these homemade treats that will leave a lasting impression. Dress them up with holiday bows, ribbon and decorative accents for a festive finishing touch.
Cranberry, Lemon & Pistachio Shortbread Dipped in White Chocolate
In large bowl, place 1 cup each softened unsalted butter and powdered sugar and beat with mixer on medium speed for 2 to 3 minutes. Add 1 egg white, 1/2 teaspoon pure vanilla extract; mix 1 to 2 minutes until incorporated. On low speed, add 2 cups all-purpose flour and 1/4 teaspoon salt; mix 1 to 2 minutes. Add 1-1/2 tablespoons lemon zest, 1/2 cup each coarsely chopped pistachios and coarsely chopped dried cranberries; mix well.
Dust work surface with flour; form dough into 12 inch long x 2 inch diameter log. Wrap dough with plastic wrap; place on cookie sheet; refrigerate at least 1 hour up to 1 day. Slice dough into 24 (1/2-inch thick) slices. On 2 cookie sheets lined with parchment paper, place cookies about 2 inches apart. Bake at 350°F for 18 to 20 minutes or until edges feel firm. Let cool 30 minutes.
In microwave safe bowl, melt 8 ounces white chocolate, cooking in 10 second increments, stirring until melted and smooth. Dip shortbread cookie half way into melted white chocolate. Sprinkle white chocolate dipped half of cookie with 1 cup finely chopped pistachios or holiday sprinkles. Repeat until all cookies are dipped and sprinkled. Refrigerate 10 minutes. Store in airtight container, in cool area up to 5 days.
Pomegranate Cosmo
In cocktail shaker or jar, add crushed ice, 1/2 cup Pomegranate Liqueur, 1/2 cup Cointreau and 2 tablespoons fresh lime juice. Cover and shake to combine. Run lime around rim of martini glass and dip rim in granulated sugar; strain Pomegranate Cosmo into martini glass.
For Pomegranate Liqueur:
In small saucepan, combine 1 cup each granulated sugar and water; heat to simmering over medium-high heat. Simmer 3 minutes or until mixture is clear; do not stir. Remove from heat; cool.
In food processor with knife blade attached, pulse 1-1/2 cups pomegranate arils to coarsely chop; transfer to medium bowl. Stir in 1-1/2 cups vodka and sugar mixture. Makes about 4 cups.
Pour vodka mixture into 32-ounce jar; secure with lid. Let stand 3 weeks in cool, dark place, shaking every other day.
Strain liqueur through fine-mesh strainer into bowl; discard solids. Cover and refrigerate up to 6 months.
Gingerbread Granola
In large bowl, combine 4-1/2 cups old fashioned rolled oats, 1-1/2 cup chopped pecans, 1/2 cup raw and unsalted pepitas (pumpkin seeds), 1 cup brown sugar, 1 teaspoon each ground cinnamon and ground ginger, 1/2 teaspoon each ground nutmeg and salt, 1/4 teaspoon ground allspice and 1/8 teaspoon ground cloves.
In separate bowl, whisk together 1/2 cup each canola oil and water, 2 tablespoons each real maple syrup and molasses and 1 teaspoon pure vanilla extract. Pour wet ingredient mixture over oat mixture; stir.
Spread granola on parchment lined, 12 x 17 inch rimmed baking sheet. Bake at 325°F for 55 minutes, stirring after 20 minutes. Stir; bake another 15 minutes or until golden brown. Let cool on baking sheet approximately 1 hour. Store in airtight container up to 1 month. Makes 9 cups. [...]
Read more...
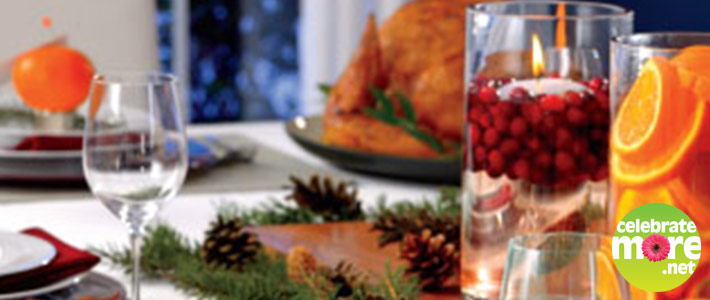
November 18, 2016Simply Sophisticated Holiday Table Décor
Preparing for the holidays can seem challenging. However, there are many ways you can turn your dinner table into a beautiful setting for guests without too much fuss. Try these simply sophisticated table décor ideas that will not add any stress, only elegance.
Add colorful foods
Using food can be a simple and visually appealing way to create an attractive setting. Fruits such as oranges, pears and cranberries, or even small pumpkins and gourds, can make for lovely centerpieces and can also act as a take home gift for guests. Fill a few glass jars or vases with a food item that adds color to your setting. Nuts can also pair nicely with many other items.
Make place cards
Handwritten place cards add a personal touch and are simple, yet further enhance your table. Or, for a printed card, use thicker paper stock in your home printer to give a more professional look.
Remember the details
The smallest details can leave a lasting impression. Tie your silverware or napkins with a lovely piece of ribbon or twine, then use a few twigs, berries or a cinnamon stick to complete the look. You can also leave candies or mints near the place setting as a gift for your guests. Details do matter!
Bring the outdoors inside
Use what you can from the great outdoors. Twigs, leaves, berries, pinecones and branches can be used as seasonal décor. Place a cake stand or other type of structure to elevate the centerpiece, and line it with an arrangement of outdoor items. Complement your centerpiece with a few ornaments or ribbons to enhance the holiday look. However, remember not to overfill your table, less can be more appealing. [...]
Read more...
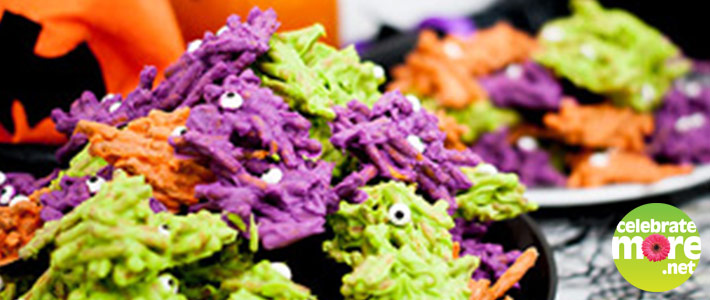
October 18, 2016Halloween is my favorite holiday and I look forward to it every year! This year I asked my friend, Sabrina her Granddaughter, Lilah and my Grandson, Payten to help make up some Monster Halloween Treats.
The kids had fun snapping the prezels in half and thought they were pretty sneaky by eating a few here and there. While they broke up the pretzels, we melted the chocolate discs. The kids loved putting the eyes on and could hardly wait for them to cool so they could eat them! We give these treats two thumbs up!
Happy Halloween!
Lynell
Coborn’s, Inc. Graphic Designer [...]
Read more...
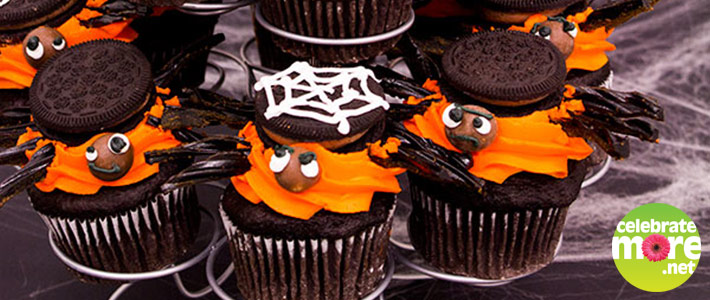
September 29, 2016Put some creep in your cupcakes this Halloween with these spider treats! To create this critters you’ll need cupcakes, frostings, chocolate sandwich cookies with chocolate filling, malted milk ball candies, and black licorice.
Icing the Cupcakes
I used orange buttercream for my cupcakes. I usually plan on using 1 and ¾ lb. of buttercream when I ice a set of 24 cupcakes, using a star tip. If you pick up 2 lbs. of white you could color most of it your preferred shade and then save a bit of it for making black and white details. I also prepared my black licorice ahead of time by cutting into smaller strips to get nice, scrawny, spider legs.
Creepy Crawly Licorice Legs
Start with your iced cupcakes. Each one will get 8 legs. I put the legs on first instead of trying to jam them in under the cookie. Lay out the legs, 4 on each side. Nestle them into the frosting to keep them in place.
Cookie Body
After your legs are in place you can set a chocolate sandwich cookie on top of them. Position a little towards the back of the cupcakes, this will leave you a little room to place the head on the next step. You can place a dot of frosting to help hold it in place if the cookie isn’t quite making enough contact. If you stuck your spider legs down into the frosting there should be enough buttercream in the middle to make the cookie stick.
Candy Noggin
Now for the head. Use the malted milk ball candy as his noggin, attaching it to the front by sticking it in the frosting. I drew little faces on my spiders with my reserved portion of black and white frosting.
Extra Creepy
To go that extra mile, try drawing little skulls on your spider backs, or a “boo!”
The best part of these little treats are that you get cake, candy, and cookie all in one dessert. Kids and grown-ups alike will be happy to help you control your pest population by chowing down on these creepy critters!
Amanda
Coborn’s, Inc. Pastry Arts Training Specialist
Click Here for more blogs written by Amanda. [...]
Read more...
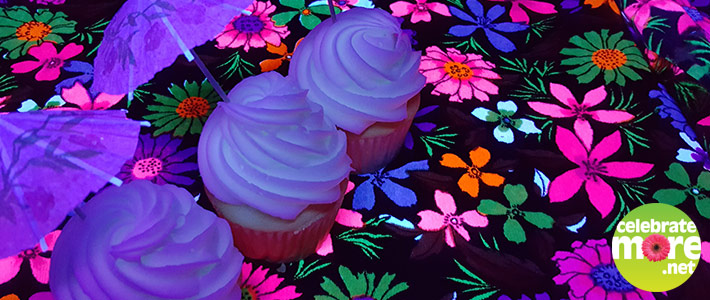
August 30, 2016While browsing cake photos in the vast world of the Internet, I kept coming across these glow in the dark cakes. Vividly glowing cakes in neon colors! A crazy awesome party with the cake acting as a beacon of birthday light in the center! Giving off light so bright you could read a book by it!
Well, of course I had to try this out. I did a little poking around and found a few ways that bakers are making their cakes glow. We’ll try and go about this in a somewhat scientific manner, as in, gather supplies and try and light it up!
The first thing I was seeing was people putting a layer of disco dust on their cakes. No thanks. Not me. Disco dust isn’t actually food, it’s just really finely ground up glitter. I know it’s not going to cause me serious harm in small doses, but I really want to stick to food magic that is 100% edible.
The next wonder ingredient I came across was tonic water! Holy Phosphorescence Batman! This stuff you can pick up in the soda aisle glowing amazing well, bright blue! I saw lots of people dunking their iced cupcakes in a mixture of piping gel and tonic water. We’ll give it a try.
I also know from my trips to the roller rink that neon colors and whites love to glow. So I made myself up some pretty colors of frosting and got ready to light up the bakery.
Now, to really give the full picture, let me say this, I’ve tried this project 3 times. The first time I got out the gels and the tonic water and the colored icings and plugged in my lamp with a blacklight bulb. Completely underwhelming. First of all, you can’t use a cheap bulb. It was just a regular bulb dipped in purple. It did nothing to the frosting. Ok, correction. It made the white frosting look purple, just like a red bulb would have made it look pink. All and all it was very disheartening. Where is my laser frosting show?!
After all this and being pumped to eat glow food I wasn’t ready to hang up my apron yet. Time for a new bulb! I picked up a 6” blacklight tube bulb, loaded me and my frostings into a dark room and hit the switch… success! Mostly. The tonic water took on a blue glow and the white frosting had a strange, faint, pinky glow on the edges. And of course my shoe laces and shirt lit up and there was a dance party. However even with the progress, it wasn’t much to write home about. It wasn’t enough! I need more power, Captain!
I began to be concerned this was a totally flawed plan and the internet wasn’t being truthful about this glow business. These spookily glowing green cupcakes were not looking possible at all. Then came time. Time for go big or go home! Time to get me a 24” blacklight tube bulb. After waving it around my kitchen like a jedi I turned my attention to the desserts. It glows! Mostly!
The tonic water, awesome! So blue! The white frosting, it was trying its best. Wherever there were peaks and valleys there were pink and purple highlights. Was it really glowing or just reflecting? I don’t know. But it looked pretty cool. I also had a bowl of piping gel. No. No glowy. And a bowl of runny frosting made of milk and powdered sugar… surprisingly glowy! I decided to add a little tonic water to the 3 types of frosting, thinking it would enhance the glowing power. It didn’t really do any noticeable difference, other than make them all too runny.
I was excited about the colored frostings, but they did nothing, even with super bulb. They didn’t even reflect light. I will admit I ran out of patience and just shoved those to the side.
In an effort to make a glowing treat I iced a cupcake with white frosting and a star tip to get good grooves and texture for the best glow. It looked nice. I think a whole cupcake stand would look cool. Next I grabbed the tonic water and flicked it all over the cupcake with a pastry brush. It gave it little speckles, along with my table. I tried a dipped one in gel/tonic water solution but all it got me was a wet cupcake, there was no super awesome green glow.
What is the moral of the story here? Yes, you can do it! You can have a glow party! Will it look like the ones online? Eh, maybe not. Depends on how far you want to modify your food for science. I still like to retain tastiness in my treats. I do think, over all, it would a fun trick to use for a glow party. Get yourself a tower of white cupcakes and splash some tonic water. And extra bonus: Add some tonic water to your beverage of choice, I just added a splash to my pink lemonade and ended up with a delightful concoction, I think I’ll make some for Halloween for the kids. Maybe it’s magic potion. Maybe it’s a strange scientific solution from a mad scientist’s lab!
For my little party set up I found a colorful fabric that loved the black light, added some pink umbrellas that took on a matching glow to the cupcakes. If it was my birthday, I think it would be a totally fun set up, and unexpected too. Also, I would get more blacklights for my party. From what I can tell the more bulbs the better, if you can up the wattage you’ll up the glow. Even without the desserts being beacons of light it was still a lot of fun eating and drinking shiny foods. I’m thinking with Halloween coming up I may need to stock up on some light bulbs.
Would I do a glow party? Yes! Would I rely on a 3 tiered birthday cake to glow? Maybe not. Not without more weird ingredients. Maybe the 4th time is the charm? There are a few more things I suppose I could try…
Amanda
Coborn’s Cake Decorator
Sartell, MN – Pine Cone Road
Click Here for more articles written by Amanda [...]
Read more...
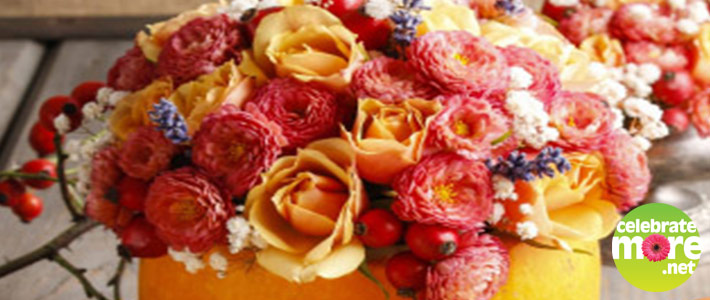
August 25, 2016DIY Fall Decor Pumpkin Flower Arrangement
This seasonal display is delightful on its own or combined with votive candles and additional pumpkins.
You’ll need:
Dried lavender stems
Fresh flowers (such as miniature roses and strawflowers) in seasonal hues
Small pumpkin
Block of floral foam
Dried or artificial berry clusters
Knife
Scissors
Not shown: Fork, plastic wrap, water
1. Use a knife to slice approximately two or three inches off of the top of a small pumpkin.
2. Use a fork to scoop out the pumpkin flesh and seeds.
3. Line the pumpkin with plastic wrap and use scissors to trim away the excess plastic wrap around the opening.
4. After thoroughly soaking a block of floral foam with water, place the foam block in the pumpkin.
5. Use scissors to cut the fresh flower stems at an angle, trimming them to a length that’s slightly longer than the height of the pumpkin.
6. Insert the flowers into the floral foam.
7. Use the dried or artificial berry clusters to fill in the spaces between the flowers.
8. Trim the dried lavender stems and use them as accents between the fresh flowers and the berries.
9. Enjoy the colors of the season! [...]
Read more...

August 25, 2016It’s almost Back-To-School time and whether your child is entering their first year of school or their last, it is always an exciting season full of new beginnings, fun transitions and lots of new things to learn and experience.
One of the most exciting times of the new school year is the first day of school. Your child has their outfit for the first day planned weeks in advance, you have the lunches made, the bus schedule memorized and before you know it they will be whizzing by you out the door.
As you and your family are filling backpacks, sharpening pencils and prepping for the big first day of school, your child’s teacher is doing the same by creating lesson plans, organizing the classrooms and preparing to teach young minds for the next nine months of the year.
You know as well as anyone that this is no small feat, so to show your appreciate here is a Back-To-School Teacher Gift that your child’s educator will truly appreciate.
Forget the shiny red apple or the somewhat overdone coffee mug; here is a gift that your child’s teacher actually wants and that he or she will use far beyond the one single school year with your child in their classroom.
DIY: Chalkboard Pen Holder
What I loved most about this craft (other than how simple it was to make!) is its usability for the teacher. There are tons of Back-To-School craft ideas out there throughout Pinterest and other craft sites, but I often find myself wondering how practical some of these gifts are – especially when the teacher may be getting several first day of school gifts!
I have a love for mason jar crafts, so when I started thinking of back-to-school I began to brainstorm how I could utilize my jars and ta-da! – The Mason Jar Chalkboard Pen Holder was born!
Read on for supplies and directions:
What You’ll Need:
To make this craft you will need:
An extra large mason jar, which can be found at any craft store near you.
Black chalkboard paint to cover the entire surface of the jar.
Paint supplies – Paintbrush, newspaper for covering the surface that is being painted over, clean up for little hands that are helping with the craft, etc.
Chalk or chalkboard markers. I think the chalkboard markers work the best for writing on the surface of the jar, but the chalk is also a cute touch when tied on the string.
Twine to tie around the edging of the rim. Be sure you have enough to wrap it several times around the lid.
Desk Supplies to fill the jar.
How To:
As I said before this craft is as easy as 1,2,3. To make simply follow along with the next three steps.
Paint large mason jar with an even layer of black chalkboard paint.
Once dry, tie twine around the lid of the jar wrapping it several times around the base of the opening and tie a piece of chalk to the end of the string.
Have you or your child decorate the jar and then fill it with fun desk items that the average teacher would want readily available on their desk within an arm’s reach.
And there you have it – A beautiful Mason Jar DIY Craft for your child’s teacher that is adorable, inexpensive, usable and creative! I hope the transition to fall and back-to-school is smooth for you and your loved ones. Stay crafty friends!
Lynell
Coborn’s, Inc. Graphic Designer
Click Here for more articles by Lynell
[...]
Read more...
July 19, 2016So far this Summer we have been very lucky to have some wonderful weather! I love getting home from work and spending the evenings in the garden. We have probably eaten just as many meals outside on the patio this year as we have inside!
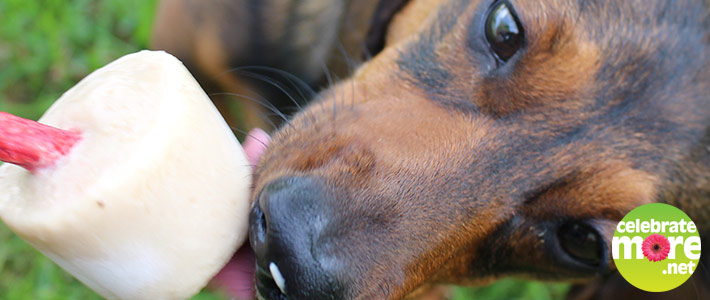
Our little fur baby, Bella, loves when she gets to come out with us and run around the yard. There’s so many things for her to explore that she never wants to come back inside. I can’t believe she will be a year old in just a couple weeks! Well, needless to say, we still spoil Bella like crazy. With it being so hot outside she gets just a little too warm running around. So, I decided to make her some fun new treats to help cool her down. She absolutely loves the puppy pops! It takes her a good 10 minutes to eat one, which is a long time for her to stay in one spot unless she’s sleeping!
These are super easy to make and they keep well in the freezer. You can split it up into however many cups you’d like according to the size of your furry friend. I split it into 6 and that’s a good size for Bella.
Homemade Puppy Pops
Ingredients
1 Cup Plain Yogurt
1 Banana, broken into pieces
1 T Peanut Butter
3 Oz. Paper Cups
Rawhide Sticks
Instructions
Combine all ingredients into a food processor; blend until smooth.
Fill paper cups as full as desired.
Place rawhide sticks into cups.
Freeze.
Remove paper before giving to dog.
3.4.3177
It really is that simple! It takes only a few minutes to make them. Since these were so fast to make, I decided to make her a second type of frozen treat as well. Believe it or not, these are even easier to make! All you need is low sodium broth and mini Milkbones. Just pour a can of broth into an ice cube tray, put a Milkbone into each one and freeze! Super fast and easy. Bella also gives it 4 paws up!
Just make sure to give these treats to your dog outside since they get messy as they melt. Hope your dog enjoys them as much as Bella does!
Ashley Maurer
Coborn’s Inc. Graphic Designer [...]
Read more...
April 19, 2016Not only have I attended a number of graduation parties for friends and relatives, but I have also put on four graduation parties myself and have helped many friends and family members with the graduation parties they are hosting as well. With all of that experience, what I have learned is that the parties that are most successful and that create the least amount of the stress are the parties that keep it simple. In all reality grad party season is so busy that many people stop by to visit for an hour or less, grab a quick bite to eat and then are back on the road. That’s why I always say simple is best when it comes to grad party planning!
With that being said if you know me well you know I do love to decorate. So let’s take a peek at some super simple graduation party decorations that won’t break the bank and that are also a festive way to display the achievements of your graduate with just a touch of creativity.
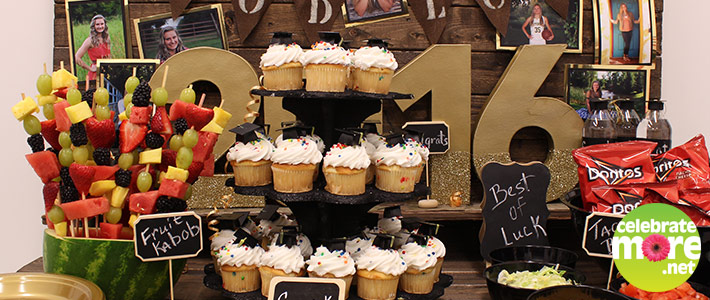
My friend’s daughter’s school colors are gold, black and green, so for the theme of the decorations I used gold and black and of course tons of glitter as well as my favorite craft essential for the year – burlap! To begin, I bought the big 2016 numbers from a craft store and spray painted them gold. Then I put glue where I wanted the glitter to be. I chose the bottom half of the number and measured to be sure the line would be even throughout all of the numbers. Using black and gold craft paper I outlined her senior pictures, pinned them to the wood background and strung burlap twine with the words “Good Luck” displayed across it.
In addition, I picked up gold napkins and plates from Coborn’s and used burlap twine that was tied around mason jars to display utensils in a creative way. Finally, I made little graduation caps for the waters and put them atop the water bottle toppers. I also used mini chalk board stands and chalk board paint on the water bottles from a craft store to label the food and decorate the drink to make everything fun and interactive for guests.
Next is the food (the most important part of any party!) For this party we bought everything for tacos in a bag. You can purchase taco meat that is already made in the Coborn’s deli department. Simply add the meat to a crock pot and by the time your guests arrive it will be ready – what a time saver. All the fixings for tacos in a bag are available at Coborn’s as well. My absolute favorite part of this party though were the fruit kabobs. Hit up the Coborn’s 5 for $15 produce sale and some bamboo sticks and this is a really simple way to display fresh fruit for any party and add a burst of color to your decorations. Be sure you pick a watermelon with a flat bottom when you are in the produce department because it makes a better base to hold the kabobs in.
Finally, we can’t forget about the Coborn’s bakery cupcakes, photo cakes or sheet cakes that can be decorated in a variety of flavors, sizes, fillings and school colors. At Coborn’s we are proud to be your graduation headquarters!!
Lynell
Coborn’s, Inc. Graphic Designer
Click Here for more articles by Lynell [...]
Read more...

March 15, 2016Spring is one of my favorite times of the year. I love the bright colors that come with the season. It’s also a busy time of the year for most people. So here is a quick, fun project to make by yourself or with the kids for all the events that will be popping up on the calendars this season! These are great since they work for Easter, weddings, birthday parties and so much more.
What you’ll need:
Food Club Dunksters Cookies
Frosting
Marshmallows, Regular and Mini
Sugar Sprinkles
Small baggies
Small bowl
Cake Pop Sticks (optional)
Directions for mini marshmallow flowers:
Take small baggie and pour in sugar sprinkles.
Cut diagonally across the mini marshmallows and put both halves in baggie; repeat.
One a good amount of marshmallows are in baggie, seal it and shake to coat the sticky side with sprinkles.
Take a dunksters cookie and put a layer of frosting on one side.
Take out marshmallow halves and place along outside edge of the cookie with the sprinkle side up.
Do a second, smaller circle inside the larger one.
Place a bit of yellow frosting or sprinkles in center, if desired.
Carefully slide cake pop stick into the creme filling of cookie, if desired.
Directions for regular marshmallow flowers:
Take small bowl and pour in sugar sprinkles
Cut regular sized marshmallow into 5 slices.
Add sugar sprinkles to one side of each slice.
Take a dunksters cookie and put a layer of frosting on one side.
Arrange 5 marshmallow slices onto cookie to make 5 petals, overlapping slightly.
Place a bit of yellow frosting or sprinkles in center, if desired.
Carefully slide cake pop stick into the creme filling of cookie, if desired.
These cookies make a beautiful cookie bouquet or a cute cookie tray as well. If you want to get more creative you could also put the cake pop stick in first, and dip the cookie in chocolate before doing the marshmallow flower. Do a variety of sprinkle colors or even mix the colors to add variety to the flowers.
Check out the video to see just how quick and easy these awesome marshmallow flowers are to make!
Have Fun and Happy Easter!
Ashley Maurer,
Coborn’s Inc. Graphic Designer [...]
Read more...
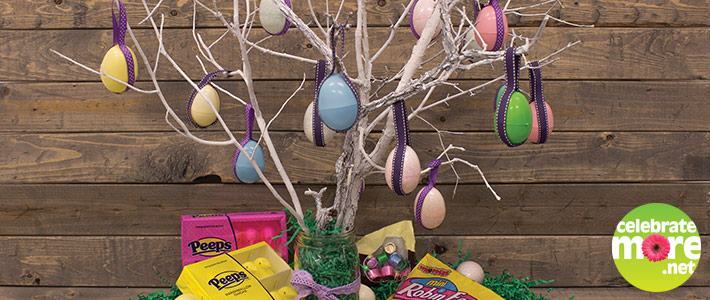
March 10, 2016It’s mid-March, with no snow, abundant sunshine and warm days- It’s giving me spring fever and before we know it Easter will be right around the corner! I love Easter because my entire family, grandkids and all my loved ones are together.
If you know me, you know I love decorating for every season. Easter is no exception and I truly enjoy decking out my home- inside and out- with festive spring decor. This Festive Easter Egg Tree served dual purpose for me this holiday season. I loved that it was an adorable centerpiece. I received tons of compliments on it from my coworkers when I brought it into work to take photos, and I can’t wait to see how much my grandkids enjoy it! It also was a great treat container. Each of these Easter Eggs contain goodies for my guests in it and I can’t wait to watch the kids faces light up when they get to pick some eggs of their very own. Similarly to a Christmas Tree, this Easter Tree made a great place to store the extra “gifts” of candies, Peeps and jelly beans that I had leftover. Add a touch of faux-grass and you just can’t beat this adorable crafty creation.
Check out the list below to see what I used to make this craft!
A variety of smooth and rough tree branches
White paint to cover the branches along with a paintbrush
Plastic Easter eggs
Fake Easter basket grass- I picked green, but you can pick any color!
1 large mason jar
Bulk candies/sweet treats from the Easter aisle
Ribbons from local craft store to decorate the outside of the jar as well as hang the egg ornaments from the tree branches
Optional: If you are making a smaller version of this craft and want to stick some styrofoam at the bottom of the mason jar it can help your branches stay situated easier.
As you can see there isn’t too long of a list to make this craft- which makes it great for a last minute decoration. Check out how I made this craft below!
First, I collected tree branches from outside. This was an easy task because there was hardly any snow in my yard! It was also fun to do with my grandkids.
Next, I painted the branches. The smooth branches took on the paint much better than the rough branches did, but I really liked the look of the rough ones so I still used both when I made my tree.
I tied a ribbon around my large mason jar. If you are like me and reuse mason jars tying it should be just fine, but if you want it to be extra secure add a touch of hot glue to hold the ribbon in place.
Fill your plastic Easter eggs with a few candies each. Don’t add too many or it may make the branches bend from the extra weight.
Secure the eggs with a few drops of glue on each side of a looped ribbon. Be sure not to glue over the seal that splits the egg in half or you won’t be able to get the candies out!
Decorate the Easter tree similarly to how you would decorate a Christmas tree! My tree had almost 20 eggs on it, but I could have added more if I wanted on the extra branches.
Now just toss some candies underneath the tree on Easter morning and enjoy the beauty of your crafty creation! I hope you enjoy this simple blog and you use it to add a little spring fever into your next few weeks leading up to Easter!
Lynell
Coborn’s, Inc. Graphic Designer [...]
Read more...
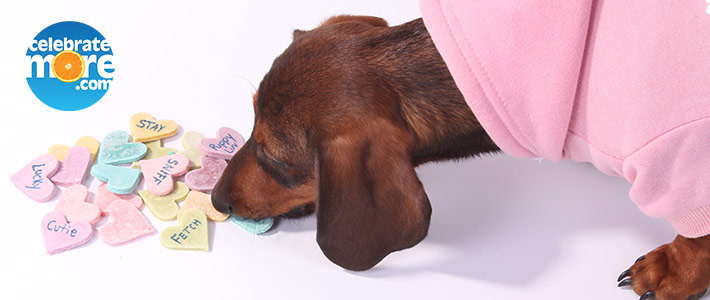
January 21, 2016Valentine’s Puppy Treats
Who says Valentine’s Day is only for humans? Treat your furry Valentine to these adorable Treats!
Shop from the comfort of your home! You can shop online at any of our proud family of stores for these recipe ingredients as well as the rest of your grocery list! We offer curbside pick up at all locations and delivery in select locations as well. Don’t forget to connect your MORE Rewards account when you shop online for extra savings, digital coupons, and many other rewards too!
Shop Ingredients
Coborn’s
Cash Wise
MarketPlace Foods [...]
Read more...
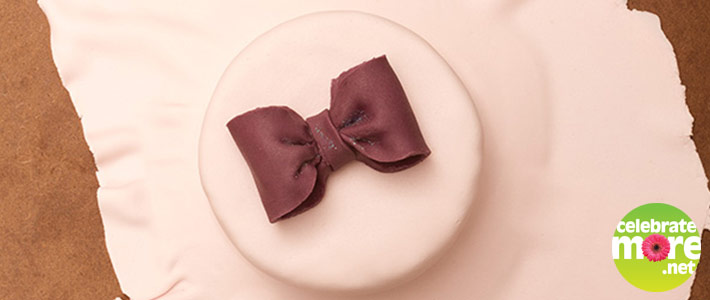
January 19, 2016Time to get fancy! Let’s talk fondant. Get out your rolling pin and nonstick mat and prepare those arm muscles for a little work out. I’ve included a little video to see the process but let’s also discuss the process from supplies to cake.
First thing you’ll need, a few special supplies. A cake, lightly iced. When you put the fondant on top it can get a bit too squishy and create a mess if your frosting is too thick. I’m going to be covering an 8” round, double layered, cake. I used 1 lb. of fondant to cover my cake but you could use a little more to give yourself a little wiggle room when covering. You should also have a fondant smoothing tool, a paddle like looking device, and a nonstick silpat mat for rolling on. Most important you need a rolling pin. I like a big heavy rolling pin for the job. You’ll also need to sprinkle powdered sugar, I like to use a shaker for this, but you could do it by hand too. I also like to use a pizza cutter for trimming my cake. It will roll smoothly around the cake. I don’t use a knife, those I keep far away from the silpat mat. Any knicks or cuts you leave behind when using a blade will show up forever after when you roll out fondant.
Ok, now to get rolling. If you want to color your fondant go ahead and do that first, then cover it up to keep it from getting crusty. Next I base ice my cake and then keep it close as I go back to start on the fondant again.
Knead your fondant, a lot. Keep kneading until it feels silky and smooth. Your hands should warm it up and make it pliable. The more you knead it the better your fondant covering experience will go. If your fondant feels dry and stiff, keep kneading. There should be a little stretch. Once it’s warmed up you can start rolling it out.
Dust your mat with powdered sugar and place your flattened ball of fondant in the center of the mat. I usually squish it out a little into the shape I want, a circle or a square. Dust the top a little with powdered sugar then start rolling. Keep rolling and rolling. Work the fondant into the shape you want. Rotate your pin, rotate the fondant. If it gets too oval or rectangular don’t be afraid to stretch back into the shape you want with your hands. Covering your cake will be easier if you can keep your fondant in a shape relatively similar to your cake. Keep checking the thickness. Give a little more muscle to the parts that are thicker. It can be tempting to use a thick a slab of fondant on your cake in the excitement of covering your cake, but be patient. A thick slab isn’t going to taste good and can squish your cake down creating slouching and puckering after an hour or so. Go thin. Shoot for about ¼” or less for a typical cake, but a little on the thicker side of that for a shaped cake to allow for stretching.
Now that you are at your desired thickness and size you are ready to cover. How big should it be? The height of your cake x 2, plus the width of the top. Then add a couple inches to allow for fidgeting and fussing.
You want to do the next steps in one, uninterrupted step. Don’t answer the phone, don’t stop for a snack. The fondant is already drying and getting a skin and if you walk away it will wrinkle and tear when you try to do anything with it, then you get to start all over.
Move your iced cake over next to your fondant slab. There are many way and tricks to picking up fondant. I don’t use them. I just pick it up like a pizzeria guy. Do it quick, yet gentle, and keep the fondant moving and you shouldn’t get any tears. If you stand around thinking with it draped over your fingers, yes, it will get deformed, but why are you just standing there? Place your fondant over the cake. There should be a little moisture left in the frosting to make it stick. If you think you are going to take more than 15 minutes to roll out your fondant covering your cake wouldn’t be a bad idea.
Lay your fondant across the top, let the sides drape down. Use your hand to smooth out the fondant from the middle to the outside. Then use your smoothing tool to briskly rub the surface. Apply pressure, just enough to work out any air bubbles. Try to work from the middle to the outside to move out any bubbles. Work quickly; your sides are starting to firm up.
Now for the tricky part, the sides. You need to start smoothing the fondant to the frosting. Work in small areas, going in a circle around your cake. You don’t need to stick it all at once. Imagine there are horizontal lines on your cake, about an 1 or so apart, just work from the top imaginary ring down to the next. By the time you get to the bottom half you’ll need to gently tug and stretch at the fondant to avoid the folds and pleats. Keep moving, keep working at it, and keep being patient. Smooth as you go to avoid air bubbles.
Once you have your cake covered you can trim the excess off from around the bottom with your pizza cutter. Now pick up your smoother again and start rubbing all over. At this point you are trying to polish the fondant up. Rub out any ripples, move any air bubbles down and out. If you have any stubborn bubbles you can poke a small hole with a thin pin and let the air out. This will leave a hole, but sometimes it’s worth the trade off on stubborn bubbles.
Congratulations! You did it! You have a smooth fondant cake. Have fun dressing it up from this point. You can paint it, stick fondant to it, and quilt it. And don’t forget the important part, you can eat it.
Amanda
Coborn’s Cake Decorator
Sartell, MN – Pine Cone Road
Click Here for more articles written by Amanda [...]
Read more...
